QuickStart Guide
Installing Vine Type takes three easy steps. Detailed instructions for each step is provided in the sidebar.
The instructions below assume a standard Windows installation with the default base folder for an IIS web server as c:\inetpub\wwwroot. If your web server is set up differently, you will need to adjust paths accordingly. It also assumes that the web server has the Microsoft .Net Framework 2.0 installed, the only prerequisite software you need.
Just follow the instructions below. You might also want to view the Installation Video where I download, install, and post an article onto a web server in under 3 minutes.
Step 1: Unzip Files
Unzip the vinetype.zip file into a temporary directory on your web server.
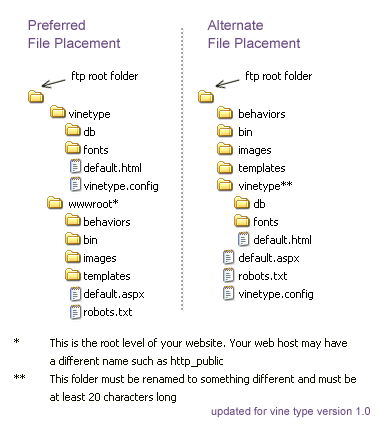
Move the contents of the unzipped Vine Type www folder (including subfolders) into the c:\inetpub\wwwroot folder. Move the unzipped Vine Type vinetype folder (including subfolder) into the c:\inetpub folder.
If your web hosting provider does not offer space outside of the web root, Vine Type also supports an alternate file placement. The vinetype.config file and the vinetype folder can be placed at the web root level. This setup requires an additional $vinetype_directory entry to the vinetype.config file with a name of a directory that is at least twenty characters long. Rename the vinetype folder to that long, hard-to-guess name.

Step 2: Set Folder Permission
Open up your new Vine Type website by typing the proper internet url (don't use a file URL) into your web browser. The default Vine Type website page should appear.
Attempt to add a comment to the home page article. The update will fail, but the error message will indicate the name of the service that will update your web site content database.
Using permission settings supplied by your hosting provider, grant Full Access permission to the db folder for the service identified above. Save your changes.
Step 3: Create Password
Vine Type comes with a configuration file called vinetype.config. Open the file with Notepad (do not edit with MS Word or other full-featured word processor) and type a password to something secret and difficult to guess.
Congratulations
Vine Type is now installed! All the benefits and features are ready to work for you. Test your setup by logging in and creating and updating new pages. Log out, then add a comment to a page to verify that the comment feature works.
With testing complete, you can now publish to your heart's content. Feel free to customize your template, create new templates, adjust your settings, date format, RSS settings, etc.